
After completing my domain set up and installing the WordPress Application, it was time to login to my admin panel (www.selladsonline.com/wp-admin). Once inside the admin section, the first thing I did was to select a theme I will be working with.

The good thing about WordPress is that it has some already inbuilt themes, from where one can further modify his or her website. It is very helpful especially for people with limited knowledge of coding.
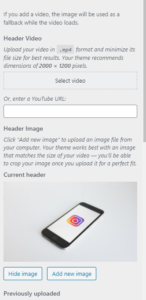
I chose the Twenty Seventeen theme because the features are appealing to me. From the dashboard, below are all the features that enabled me change the site title, color, change the header image, and delete some sections in the homepage.


The greatest challenge I encountered was how to change other images in the background. I had to watch a couple of online videos to figure out I had to go to the page section from the dashboard from where I could make changes in all the contents in the pages.

I used this process to change all the images in all the pages of my website. Before doing so, however, I had to go to pixabay to get free images. This is the first step of customizing my theme and I will continue until I realize all the features I want on my website.

This entry is licensed under a Creative Commons Attribution-NonCommercial-ShareAlike 4.0 International license.
Awesome!
Thanks so much for this illustrated tutorial of your steps! I find it super helpful to use screen shots, it helps us retain the info and also help our classmates!